- Category:
Home Energy Savings -
Last updated:
November 17, 2022
Types of Weatherstripping and Tips for Installation
Improving all weatherstripping types and repairing your existing weatherstripping is an easy and affordable way to make your home more energy efficient. Windows, doors, and other openings around your home with old, damaged or completely absent weatherstripping can leak cool air in the summer and hot air in the winter.
With a little information about types of weatherstripping that are available and tips on how to install weatherstripping, you can make your house up to 20% more efficient. When it comes to winter home improvement projects, this one pays off.
7 types of weatherstripping and their uses
When planning how to weatherize your home, you will want to consider various weatherstripping types. Weatherstripping comes in a wide variety of materials and styles, each with their own specific uses, benefits, and disadvantages. Let’s take a look at the common materials and uses for these readily available types of weatherstripping.
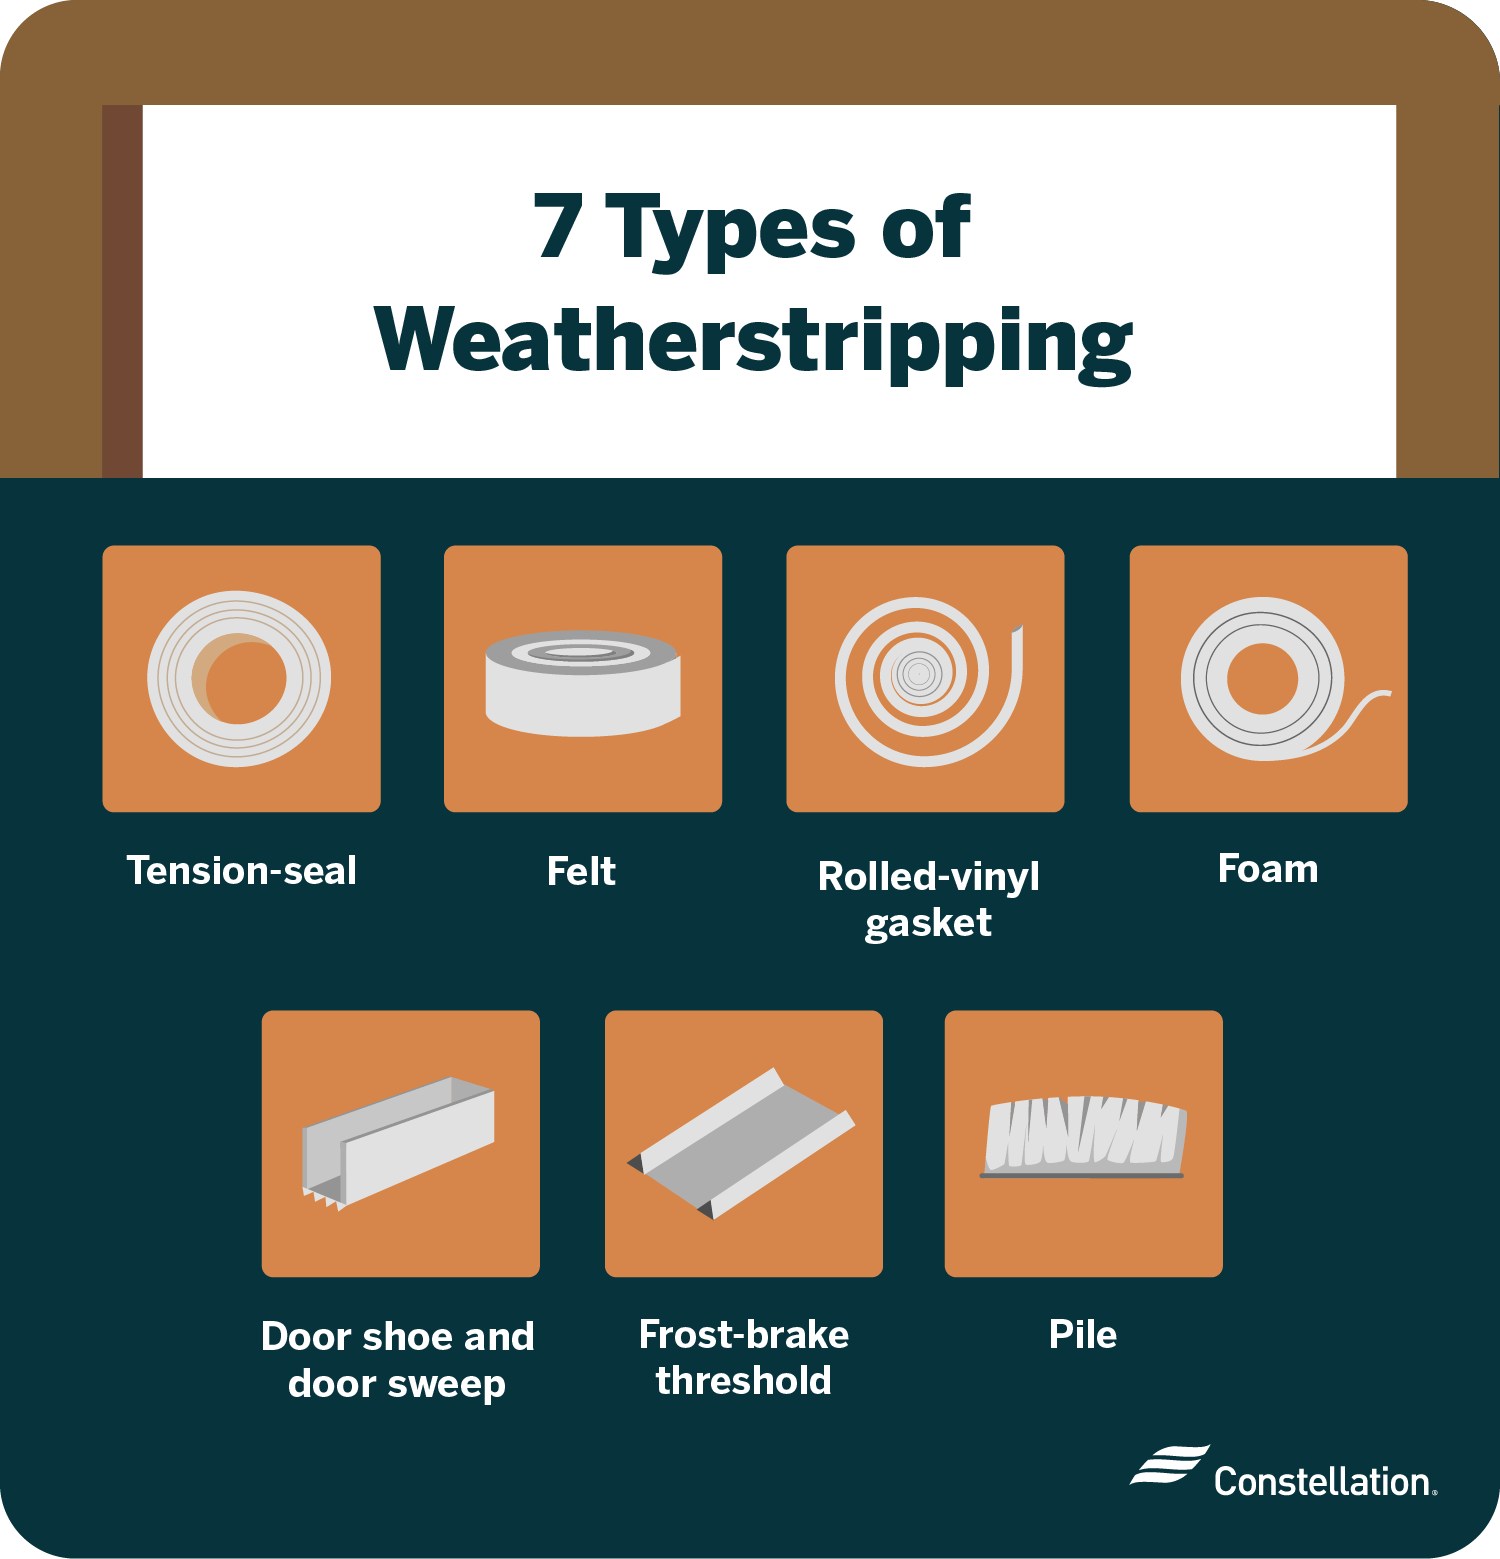
1. Tension-seal weatherstripping
This kind of weatherstripping is made of vinyl, aluminum, or stainless steel. The material is folded into a V-shape that creates spring-like tension when compressed to form a tight seal. Because of its shape, it is also known as V-strip or V-channel weatherstripping. This durable, nearly invisible alternative is good for sealing doors and windows. It does take some skill to install properly, and can make it harder to open and close windows and doors.
2. Felt weatherstripping
Felt weatherstripping is a traditional material that is one of the least expensive ways to seal doors and windows. It is easy to install and comes either plain or reinforced with a pliable metal strip. Unfortunately, it is the least effective and least durable option.
Use it on windows that are not frequently opened and to fill gaps around your home that are not subjected to movement. If you go this route, opt for all-wool felt, as it lasts longer than other types of weatherstripping felt.
3. Rolled-vinyl gasket weatherstripping
Flexible or rigid rolled-vinyl gaskets are a good choice along door jambs, window stops, the bottoms of doors and window sashes. They are a durable and weather-resistant option. When it comes to how to install weatherstripping of this type, the spools are easy to unroll and apply. It is also a moderately priced option.
One drawback of these weatherstripping types is that the material is visible once in place. And over time, the adhesive can break down and the material can peel away.
4. Foam weatherstripping
Foam weatherstripping is a type of compression weatherstripping that comes in tape form or attached to wood or metal strips for reinforcement. Foam tape is a good choice for irregular-shaped corners and cracks. Reinforced foam weatherstripping is good for frequently-used doors and windows. Tape is easier to apply, but it is not as durable. The reinforced variety is a bit trickier to install, but lasts longer.
5. Door shoe and door sweep weatherstripping
Door shoes and door sweeps are two ways to seal the gap between a door and the floor. A door shoe is made out of U-shaped aluminum that’s fitted with a vinyl insert and attaches around the bottom of the door. A door sweep is a wooden or metal strip fitted with a nylon blade that attaches to the outside of the door.
Both of these options are generally very durable, but they can be difficult to install. You may have to take the door off its hinges and plane it down to have enough space for the weatherstripping to allow the door to open and close smoothly without sticking.
6. Frost-brake threshold weatherstripping
A solid threshold works as a thermal bridge that transfers heat or cold between the outside and inside. Metal thresholds are very durable, however, they are efficient thermal bridges. In this case, efficiency isn’t a good thing. In winter, they can get cold enough that water condenses and freezes on them, which can lead to physical damage and mold.
Frost-brake thresholds divide the solid material with vinyl or silicone inserts that create physical divisions to interrupt the flow of heat or cold. Installation takes expertise, but if you live in a place that experiences temperature extremes, installing them might be worthwhile.
7. Pile weatherstripping
Pile weatherstripping consists of dense fibers attached to a metal strip. They are commonly used in sliding windows and sliding glass doors. They are difficult to install, tend to collect dirt, and can become unstuck over time. When properly installed and maintained, however, they are effective.
How do the materials of weatherstripping compare?
Various materials used in weatherstripping offer pros and cons that you will have to weigh as you consider ways to save energy in your home. Making the right choices can cut your average home power usage.
Vinyl vs. rubber weatherstripping
Vinyl vs. rubber weatherstripping choices are plentiful. In general, vinyl offers more shape and color choices and provides superior strength and durability. Both materials are flexible and easy to install. Vinyl is less expensive, but is a petroleum product. Rubber is an organic renewable resource, which is appealing to some.
Rubber vs. foam weatherstripping
Deciding between rubber vs. foam weatherstripping is a question of trade-offs. Rubber is a natural product, but can be more challenging to install than foam. It is more expensive, too. In extremely cold conditions and in direct sun, rubber can crack and break down. Foam is made from petrochemicals, so if you want only environmentally friendly, green products in your home, foam is not a good choice.
Rubber vs. felt weatherstripping
Rubber weatherstripping is more effective, easier to clean and more durable, than felt weatherstripping. It is also more expensive and harder to install. Felt is renewable and manufacturing it is less damaging to the environment. If you are looking for a green option, felt is a good choice.
How to install weatherstripping
Now that you’ve settled on the types of weatherstripping that work best around your home, the next step is to install it.
Start by doing visual inspection of your doors and windows to see where weatherstripping is damaged, inadequate or missing. Also, check for air leaks around your house to prioritize where to start your project.
You will begin by measuring the perimeters of all of the doors and windows that need weatherproofing. It is a smart idea to add an additional 10 percent to your measurements to account for mistakes. Also consider the thickness and widths of your materials so that you choose the right one for each application.
How do you replace weatherstripping around a window?
Replacing weatherstripping around a window is the same process as replacing weatherstripping around a door.
- Start by removing all of the old weatherstripping. New weatherstripping must be applied to a clean, dry, flat surface to properly adhere.
- Use a single, continuous strip along each side.
- Make sure that the weatherstripping fits snugly together at the corners.
- When in place, the window should fit tightly against the weatherstripping without being difficult to open.
The best weatherstripping in the world cannot overcome old, leaking windows. One of the best home improvements for resale value increases in your home is replacing broken and drafty ones with new energy-efficient windows.
How do you seal a garage door?
- If present, remove any old weatherstripping, making sure that the surface is clean, dry and flat when finished.
- Measure the top and the sides of the garage door, and cut pieces of weatherstripping to size.
- Starting along the top of the garage door, attach the weatherstripping loosely until the strip is completely in place. Then tighten all the screws.
- Complete the same steps on both sides of the garage.
- Test your garage door, ensuring that the weatherstripping does not interfere with the garage door’s ability to open and close.
Repairing and replacing weatherstripping tops most winter energy saving tips lists–and helps you heat your home efficiently during fall, too. Replacing or installing new types of weatherstripping is a relatively inexpensive and easy task. When it comes to making your home more comfortable and more efficient, it is effort well spent.